Writing a book involves inspiration, motivation, self-awareness, discipline, healthy self-criticism, and stamina. Finding strong motives and goals will help you stay afloat during the big journey named “writing a book.” However, this section will tell you how to take the glasses off and find a real purpose for writing a book.
Contents
- Finding reasons for writing a book.
- Researching the topic
- Mind mapping websites and services.
- Target audience.
- 5 steps to identify your possible audience:
- Preparing to write
- Text editing applications
- Writing the first draft
- How to edit your book in 7 steps
- Deciding where to publish
- Coming up with a book title
- 6 steps to pick a book title
- Tips to follow when creating a book title
- Creating book cover
- Online free tools to create the book cover by yourself
- How to create a book cover on Amazon
Finding reasons for writing a book.
Many writers strive to sell the book instead of making something purposeful. If you want to create a textbook or a piece of writing that teaches your readers something, you need to understand several crucial moments. Answer the following questions:
- Why do you need to write the book? Just making money by selling books is not enough. With only money on your mind, you won’t be able to write something unique.
- Do you have a solid idea about the book to write? Just imagine that you will write about your idea for weeks and months. You will need to think about it daily and come back to it again and again after a short break.
- Do you have enough time? It may seem that writing a book doesn’t take too much time. But, creating an outline, coming up with the first draft, editing, polishing, creating a title, and formatting the text before publishing takes a lot of time. A LOT. If you have full-time work, a family, and other activities, make sure you can insert book writing into your tight schedule.
- Do you realize it’s hard work? With a bunch of enthusiasm and inspiration, you will write some parts of the book, but in the long run, you may experience all difficulties all writers face: writer’s block, procrastination, self-doubt, and much more.
- Who is your audience? If you plan to write for students, you need to understand their troubles and how you can fix them with your book. Write the list of pains and possible solutions.
So, have you answered the questions? Are you still willing to write the book? Let’s go to the next stage!
Researching the topic
Limiting the scope.
If you have an idea for a textbook or a self-help book, it’s time to limit your topic. It’s highly important as any book has to have a central point and be accessible to the reader. For example, if you aim to help people to write better, you need to make an accent on the audience (for college students, managers, copywriters, etc.) or specific topics (books, essays, letters, etc.).
Abstract topics will give a wide field of work, so you won’t be able to concentrate on solving particular problems and disclose solutions within a limited amount of words. Moreover, broad topics are less popular within publishing houses as they seek fresh ideas, titles, and meanings.
Research the existing publications (both printed and ebooks) about the desired topic. Get copies or learn the content to identify potential knowledge gaps if possible.
We recommend you visit Amazon and search the categories related to your topic. For example, you can choose Education & Teaching categories with subcategories like Studying & Workbooks and Childhood Education. You also would consider checking Higher & Continuing Education, etc. Look through the top 100 book lists and point out how authors named their books, read the book summary and product details. All these will give you inspiring ideas and tips. Create your list of publications you wish to follow. Make separate lists for great examples of writing style, book titles, illustrations, information, and other helpful information.
Creating outline.
No matter whether you are going to write a textbook or a novel, creating an outline is essential. It’s a roadmap for your future journey. Most writers find it helpful, as the structure of writing will help you decide your future work into pieces and properly organize your thoughts. Moreover, a good outline keeps you on track and avoids writer’s block.
If your book should resolve a particular issue for the reader, make a list of steps you plan to disclose to the reader. Try writing extended sentences to reveal points better.
Every book has a beginning, middle, and end. How will you introduce the central theme at the beginning? How will you continue disclosing it in the body part?
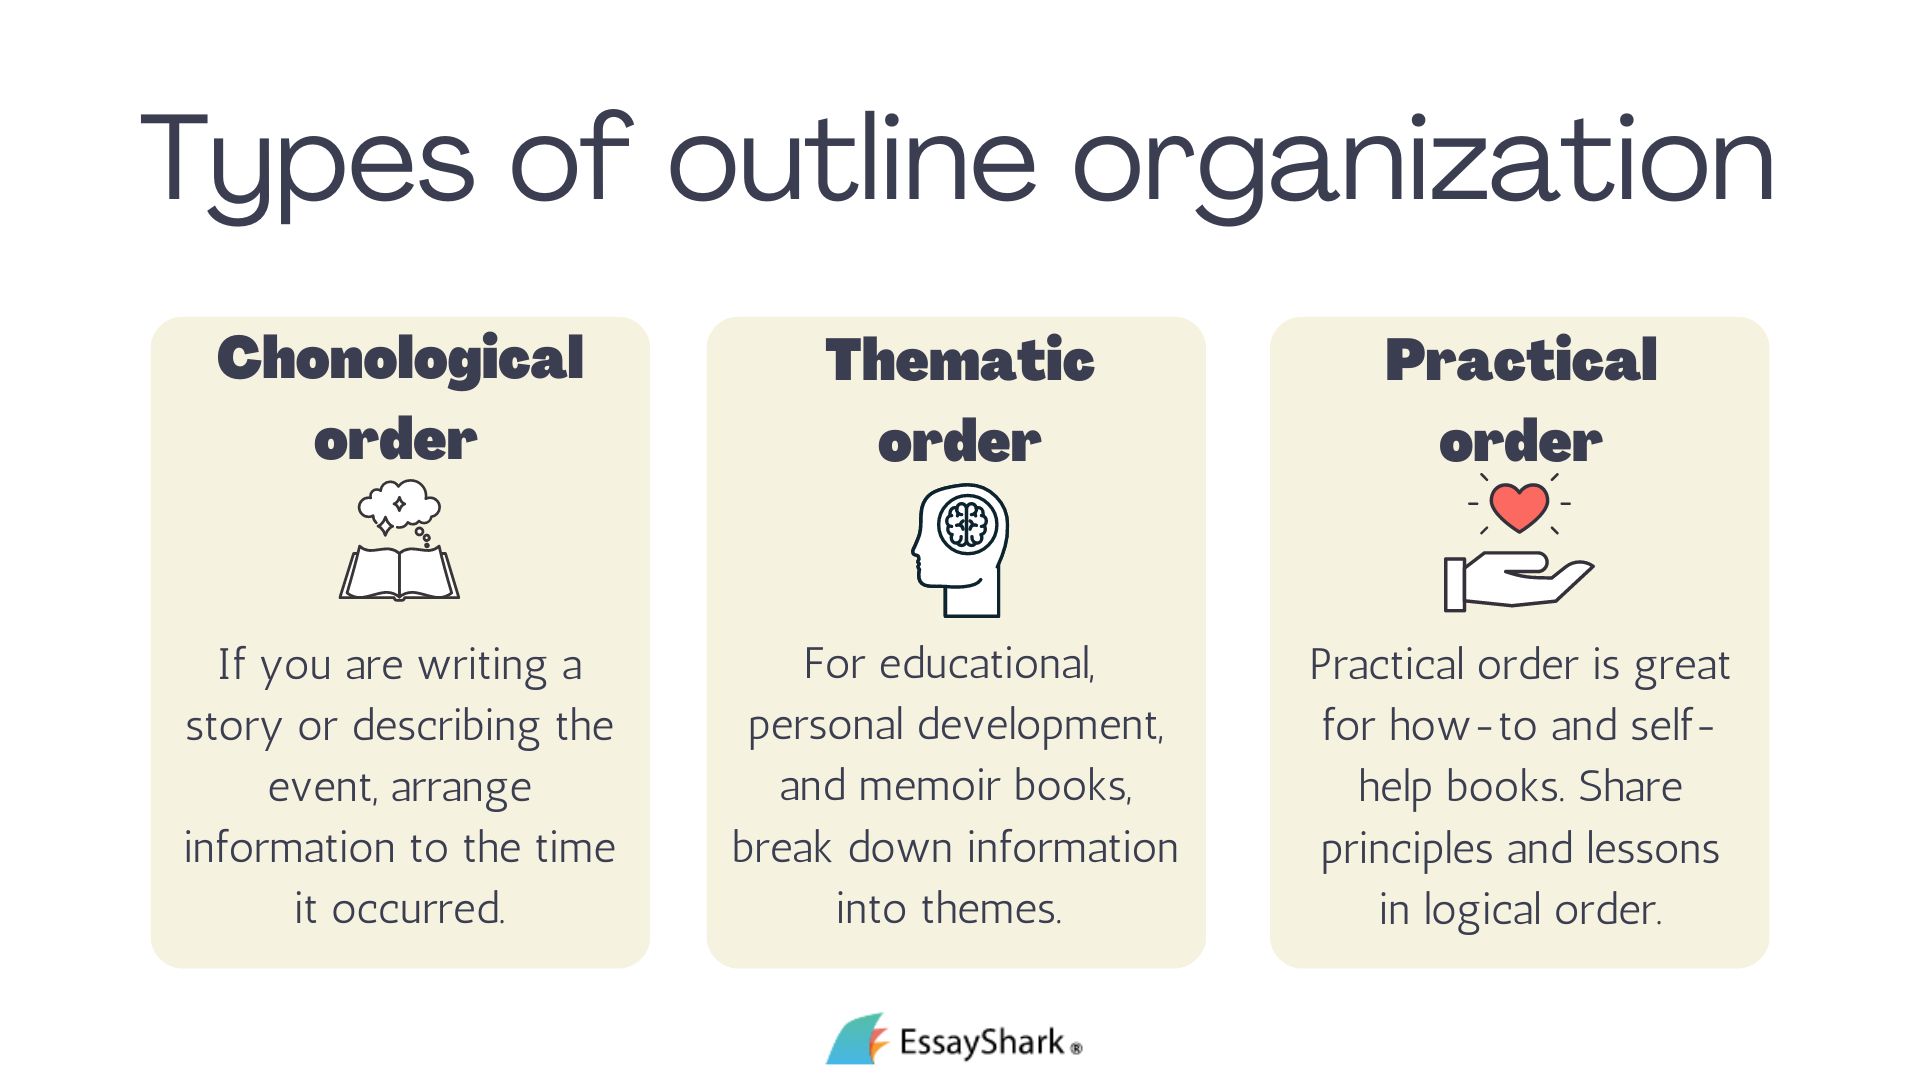
Here are the typical outlines you can use:
- Mind map. The visual organization of your ideas is connected to the central idea.
- Synopsis. It’s a short description of your book following all chapters and plot twists.
- Save the Cat! Beat sheet. This method is better for novels and fiction. The main idea is to divide your plot into 15 beats. Learn more with this step-by-step guide and worksheet.
- Thematic method. It’s a great way to order the thoughts for books connected to business, self-development, and other non-fiction books. Divide the topic into logical subtopics to reveal the main idea.
- Practical method. It’s a great way to present ideas in a self-help book. You can move from explaining the pain to solutions and practical advice smoothly.
Creating outlines for each chapter will be advisable if you are writing a textbook. It may seem there is a ton of information to tell the reader, but you need to disclose information step by step and not overwhelm the reader with new information.
Mind mapping websites and services.
Have you ever used a mind-mapping technique? You can do it with a single piece of paper and a pencil. All you need is to write the main idea at the center of the paper and draw the lines for the new thoughts that appear in your mind.
For a better experience, you can create a digital version of a mind map in PowerPoint or even Paint. But the functionality of such is limited. That’s why we recommend using specific applications which get recommended specifically for mind mapping.
MindMeister. Free options are enough to create a simple mind map. Functionality is enough to quickly organize your thoughts on various levels and edit and delete threads. You can even share your map with someone you want to discuss the ideas.
For example, you can see how we have used MindMeister to create an outline for this article here.
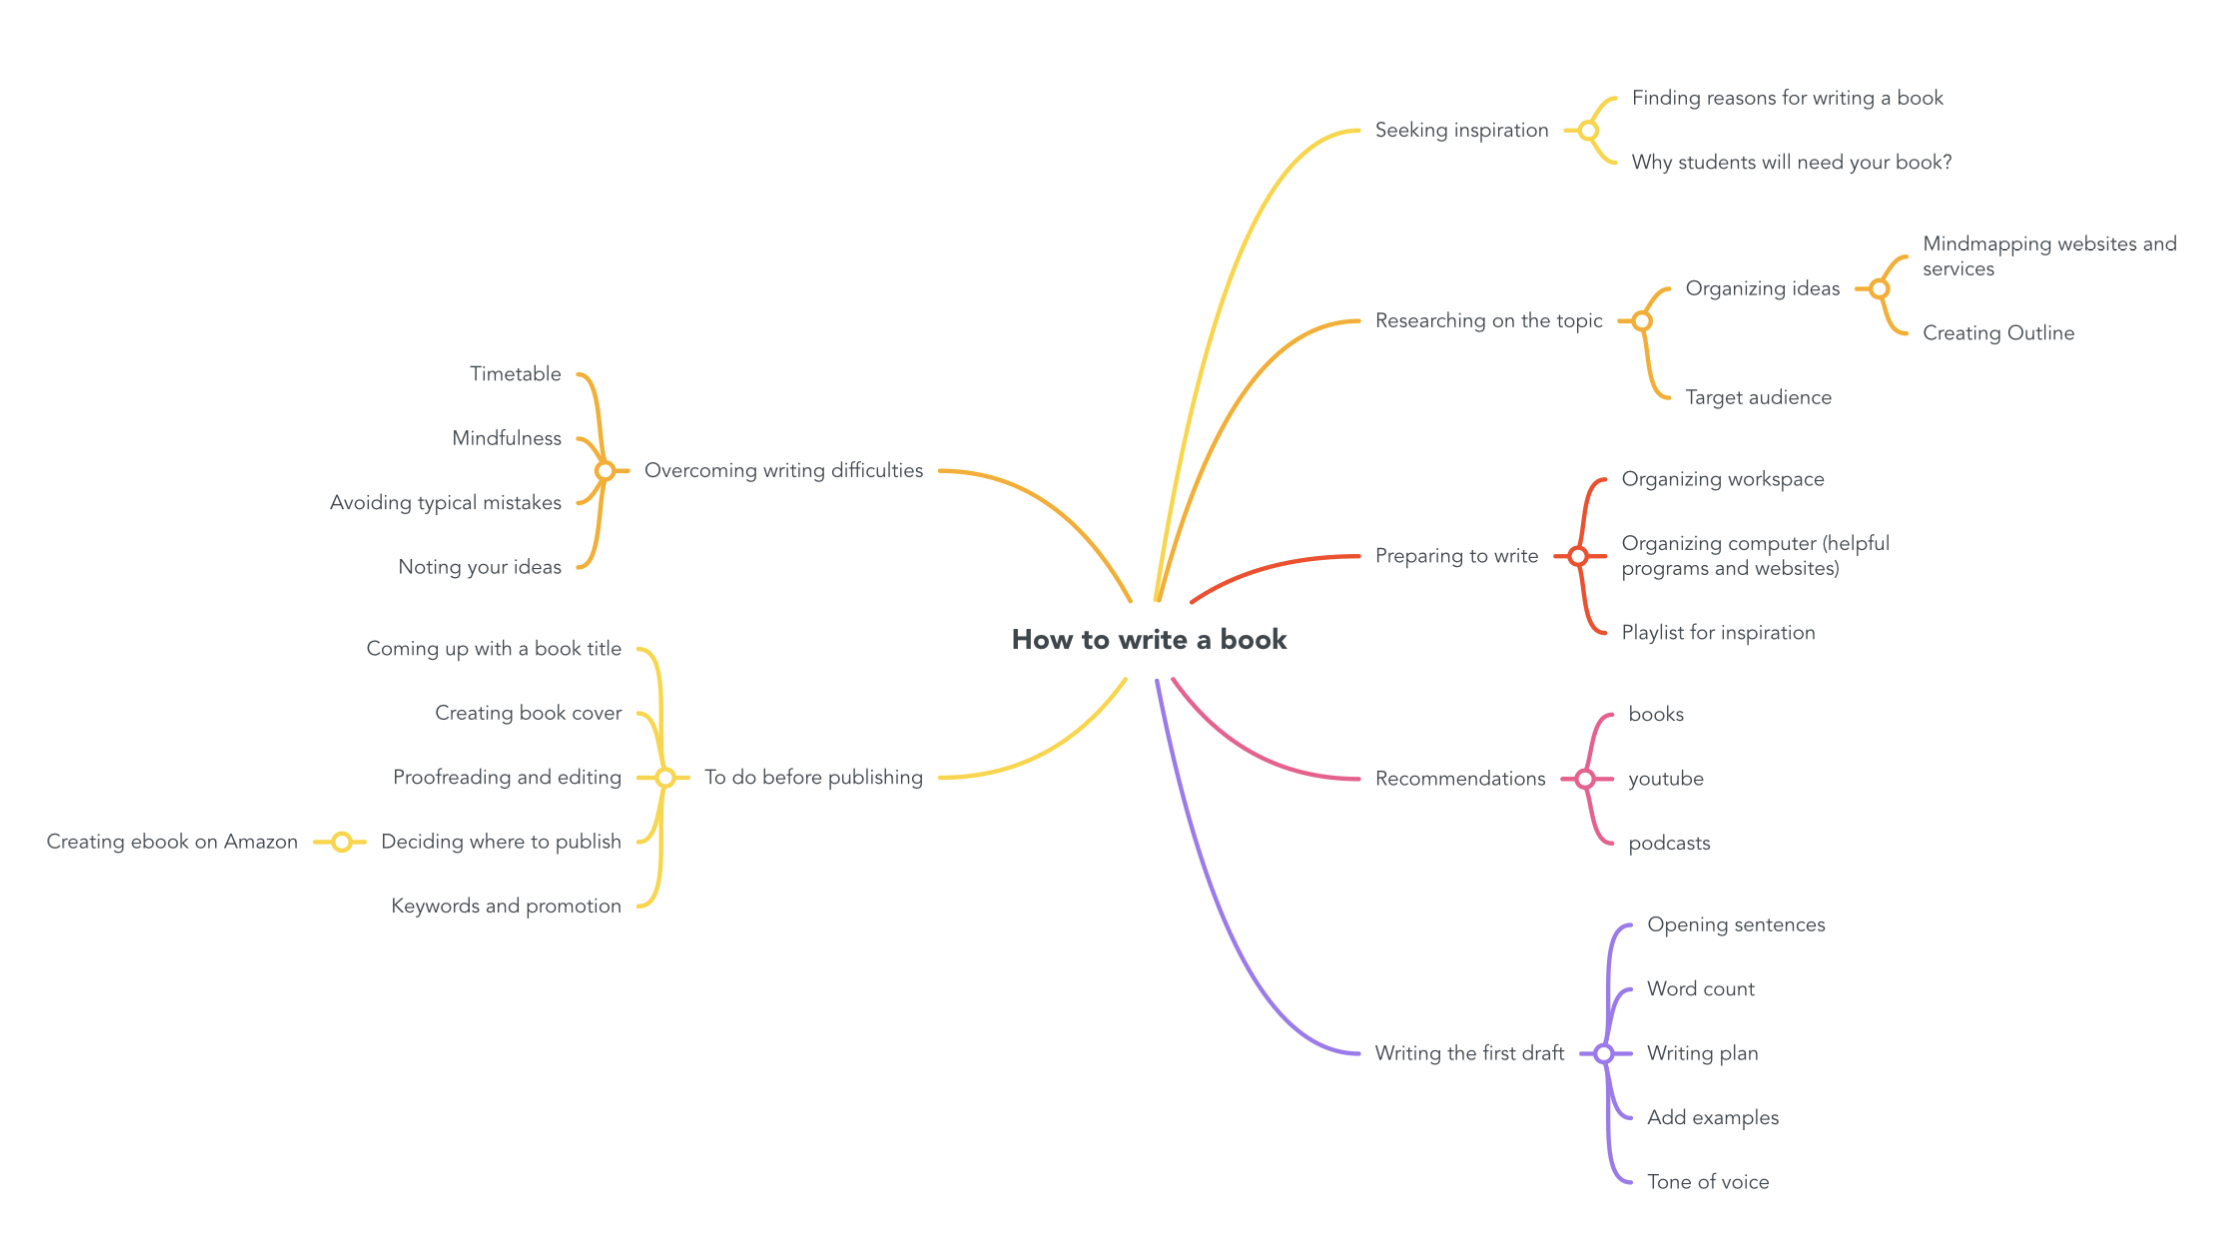
Miro. Another mind map service includes a free plan. It offers various mind maps, note-taking, planning, and brainstorming templates. Also, very intuitive and easy to use.
Milanote. This service describes itself as a mind-mapping software with multimedia and note-taking functions. For writers, they offer a list of mind mapping templates: novel plan, story map, story outline, research, and more.
Using pen and paper is more usual for mind maps, but with special service, you won’t have space limits for your thoughts. Besides, editing blocks and inserting additional materials and links are much more manageable. All you need is to choose the service which is more comfortable to use.
Target audience.
Why do you need to identify your prospective audience? Simply saying, your audience will give you a better idea of the content, language, and places for other advertising and promotion.
Identify the reasons people will care to read your book. Remember that people will take their time and not rush to buy your book because you are an author or the book title sounds excellent. For example, if you are writing a self-help or nonfiction book, your audience will care about how your book can solve their problems or satisfy their needs. You need to explain how your book will solve their problems.
Think about demographics. While it’s a pretty old method of defining the target audience, it still gives you the basics. For example, your reader’s location or religion may influence the specifics of your book topic. But such a method has a lot of gaps, as it needs to consider people’s subjective opinions and attitudes. That’s why you need to consider the next point to get more details about your audience.
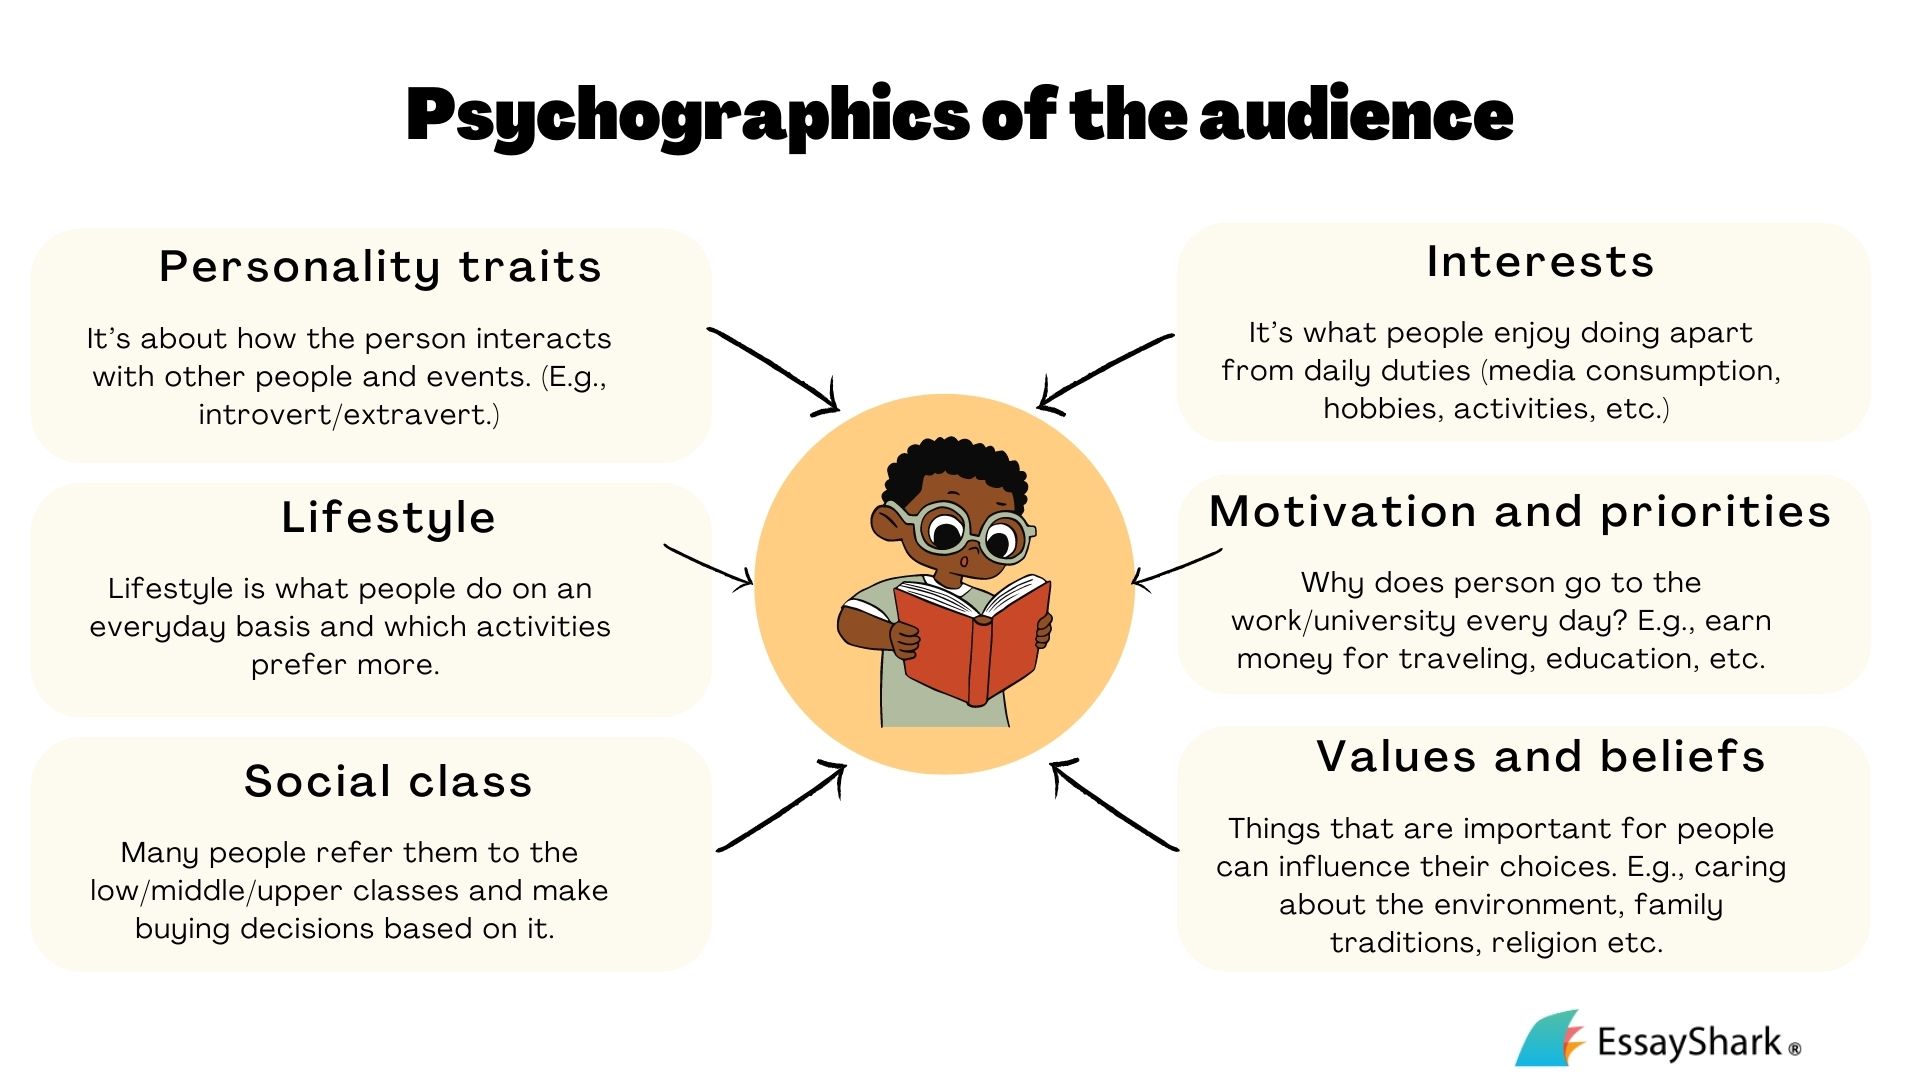
Focus on psychographics. What does it mean? Psychographics define the way people think and why they buy. The research involves identifying a person’s values, interests, lifestyle, tastes, etc. For example, if you wish to write a book regarding time management, the psychographic information will look like “wants to build a career and have children, but doesn’t have much time.”
Tip: While you can organize the research by yourself, you can use focus groups, conduct surveys, and ask for market research from marketing services.
5 steps to identify your possible audience:
- Define who will more likely read your book. You will need to adapt your writing style, examples, data, cover design, and title following the target audience’s tastes.
- Expand prospective markets. For example, a book about writing essays will initially target college and university students. Still, at the same time, it will be helpful for teachers, parents, language classes, and other audiences.
- Make up a list of similar books: Research Amazon and other bookstores to identify books that look like your future book. Identify book categories and titles of the best-selling books. Make a list and screenshots of the best ideas.
- Search people’s interests. Look into book communities like Goodreads, LibraryThing, Litsy, and others. Make a simple search on Google and Facebook to find other communities and groups which discuss books of your category.
- Make a portrayal of your reader. Do the research and describe key features of the audience: age, personality traits, lifestyle, interests, social class, interests, and other points.
Preparing to write
While you can say that the author may create a masterpiece in any environment and circumstance, the truth is that inspiration is not enough. When you have a muse, you can write even on a napkin in a toilet room. But, when you need to write a great piece of writing, you will face various challenges requiring special attention and creativity. Here are some typical problems you may face at home while seeking inspiration.
Organizing a workspace.
It’s great to have your corner where you can sit and concentrate on your text. Here we will discuss the most important touching points to organize your corner effectively.
- Noise level.
Your corner writing space should be free from annoying and distracting sounds in an ideal world. A quiet environment enables good meditation and the flow of ideas. Whether it’s your family or roommates, try to find common sense to keep your environment quiet. By the way, buying noise-cancelling headphones contributes greatly in the long run. Make a calming or inspiring playlist to turn on while working.
Tip: Reach an agreement with cohabitants to make no noise or find a quiet workplace.
- Clutter.
According to the research, your workplace environment influences your overall productivity level. It’s essential to clean your table and keep only necessary things like a laptop, notebook and a pen. But it doesn’t mean you need to leave your desk ascetic. You can stay creative and make mood boards, keep paintings, favorite plants, or any lovely trinkets.
Tip: Just do regular cleaning and decluttering to avoid the mess and have everything you need for writing at hand.
- Light.
Did you know that poor lighting may influence not only your productivity but also your mental health? Natural light is preferable for lightning during the day, so place your table near the window if possible. Also, take care of artificial lighting in the form of table lamps or other lightning sources with appropriate light color temperatures.
Tip: Use artificial neutral light for cloudy days and work at night. Choose light bulbs with 3,500-4,500 K temperature; it’s the best option for productivity and mood.
Notifications.
One of the most disturbing things that may influence your writing productivity is notifications on your laptop and smartphone. Calls, messages, social media, and notifications from various applications will seduce you to procrastination and doing everything except writing.
Tip: Turn on the night mode on your devices or even flight mode if you don’t expect any calls.
- Social media.
Limit yourself from social media when you dedicate time to writing the book. Turn on notifications, AND DON’T CHECK SOCIAL MEDIA. Try checking on various distraction methods if you feel addicted to Instagram, TikTok, or other social media platforms. Social media can be a bad influence, especially when your attention is needed elsewhere. Finding ways to ignore the notifications on your phone will go a long way in saving time to work on the book.
Tip: Download application blockers (e.g., AppBlock) or browser extensions to limit websites that distract you too much (e.g., StayFocusd for Chrome).
Organizing the computer (helpful programs and websites).
While it’s great to declutter your desk, you still have room for improvement — a messy desktop and tons of Untitled 2.docx and Untiteled41.docx. If you waited for a sign from above to finally put in order documents and folders on your laptop, this is it!
First of all, take as a rule to name your documents correctly. When you think of starting to write a book, you need to organize your draft and research information properly. Save each chapter in a separate document and name it appropriately. Create an Excel document to store the links for helpful information or any other application.
Text editing applications
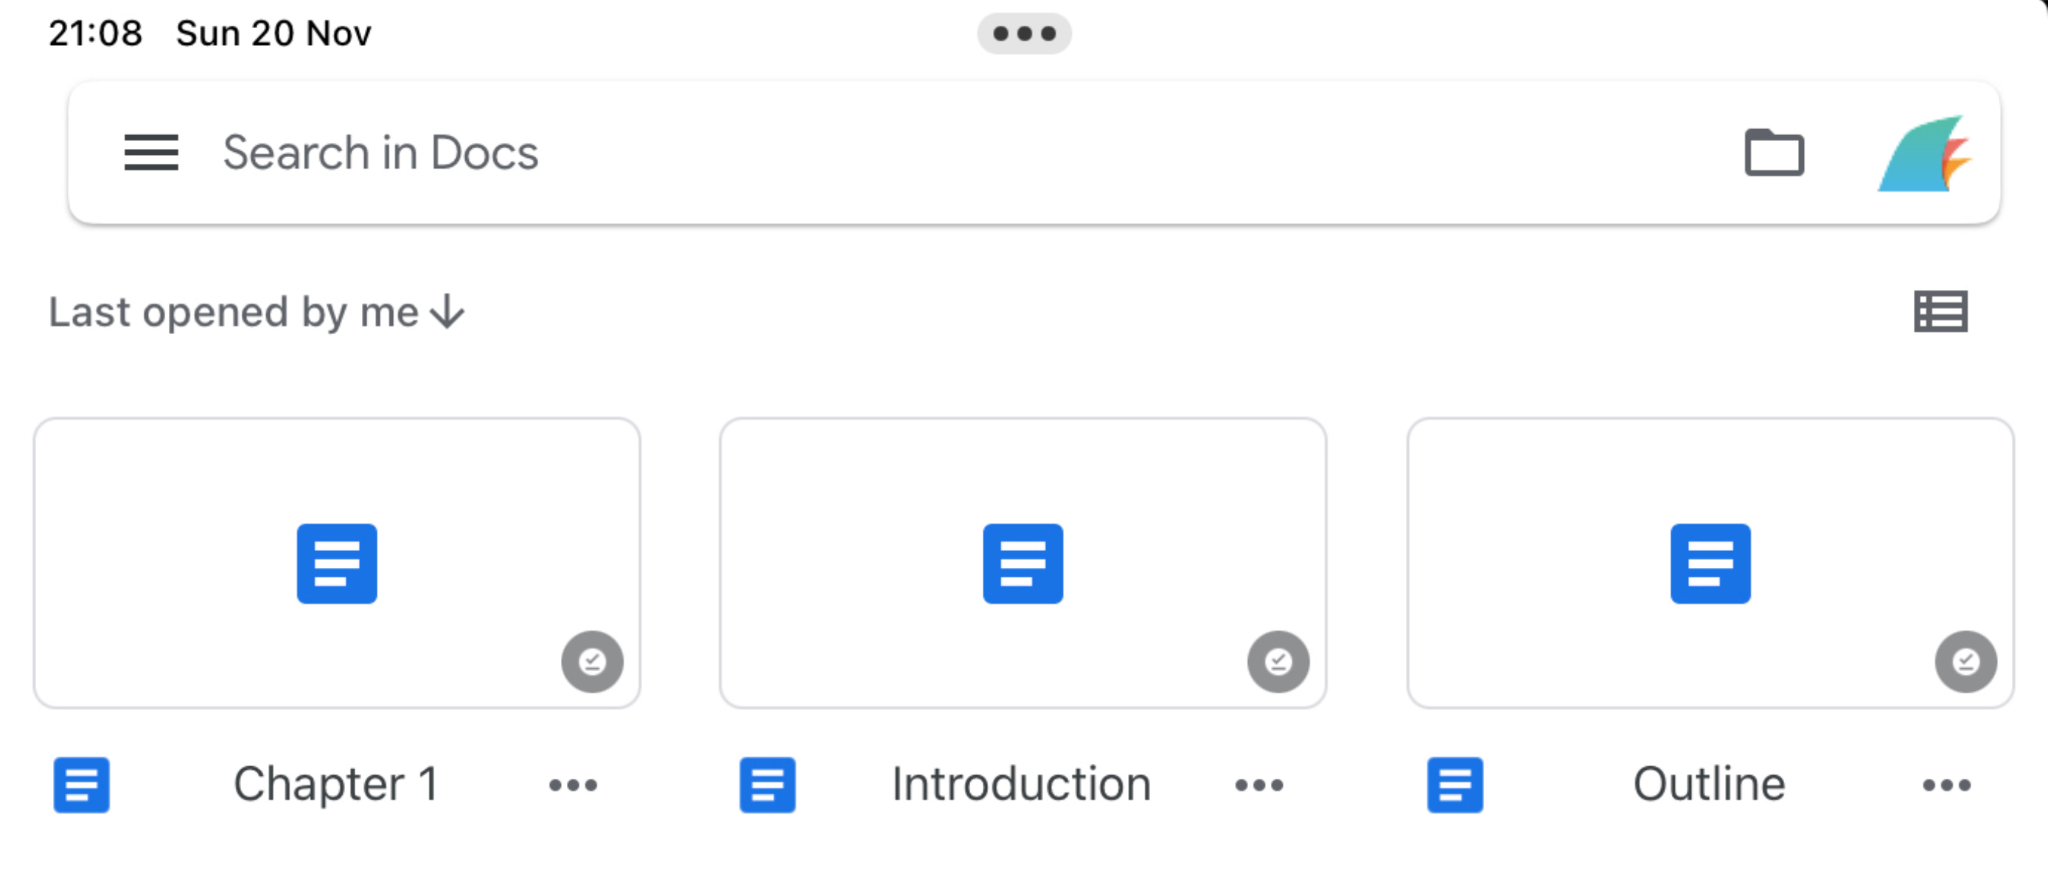
Google Docs. If you already have an account on google, you can easily use its text editor with cloud support. It’s an excellent alternative for Word and Pages. If you download Google Doc applications, you can enable offline functions to create documents without access to the internet. This service gives you flexibility in storing texts and information for your book in the cloud. You can access your text at any place and device without installing it.
Moreover, if you work in a team, you can easily share documents with others, allowing them to edit and check the text anytime.
Evernote. It’s also a cloud space for writing, researching, and note-taking. Create an inspiring mood board and get quick access to your notes in one place. Moreover, you can use templates for the storyline, chapter outline, story premise worksheets, and more. This application is also cloud-based, so you can use it anywhere, like Google Docs. Moreover, you can add audio files and create to-do lists to stay tuned into writing your book.

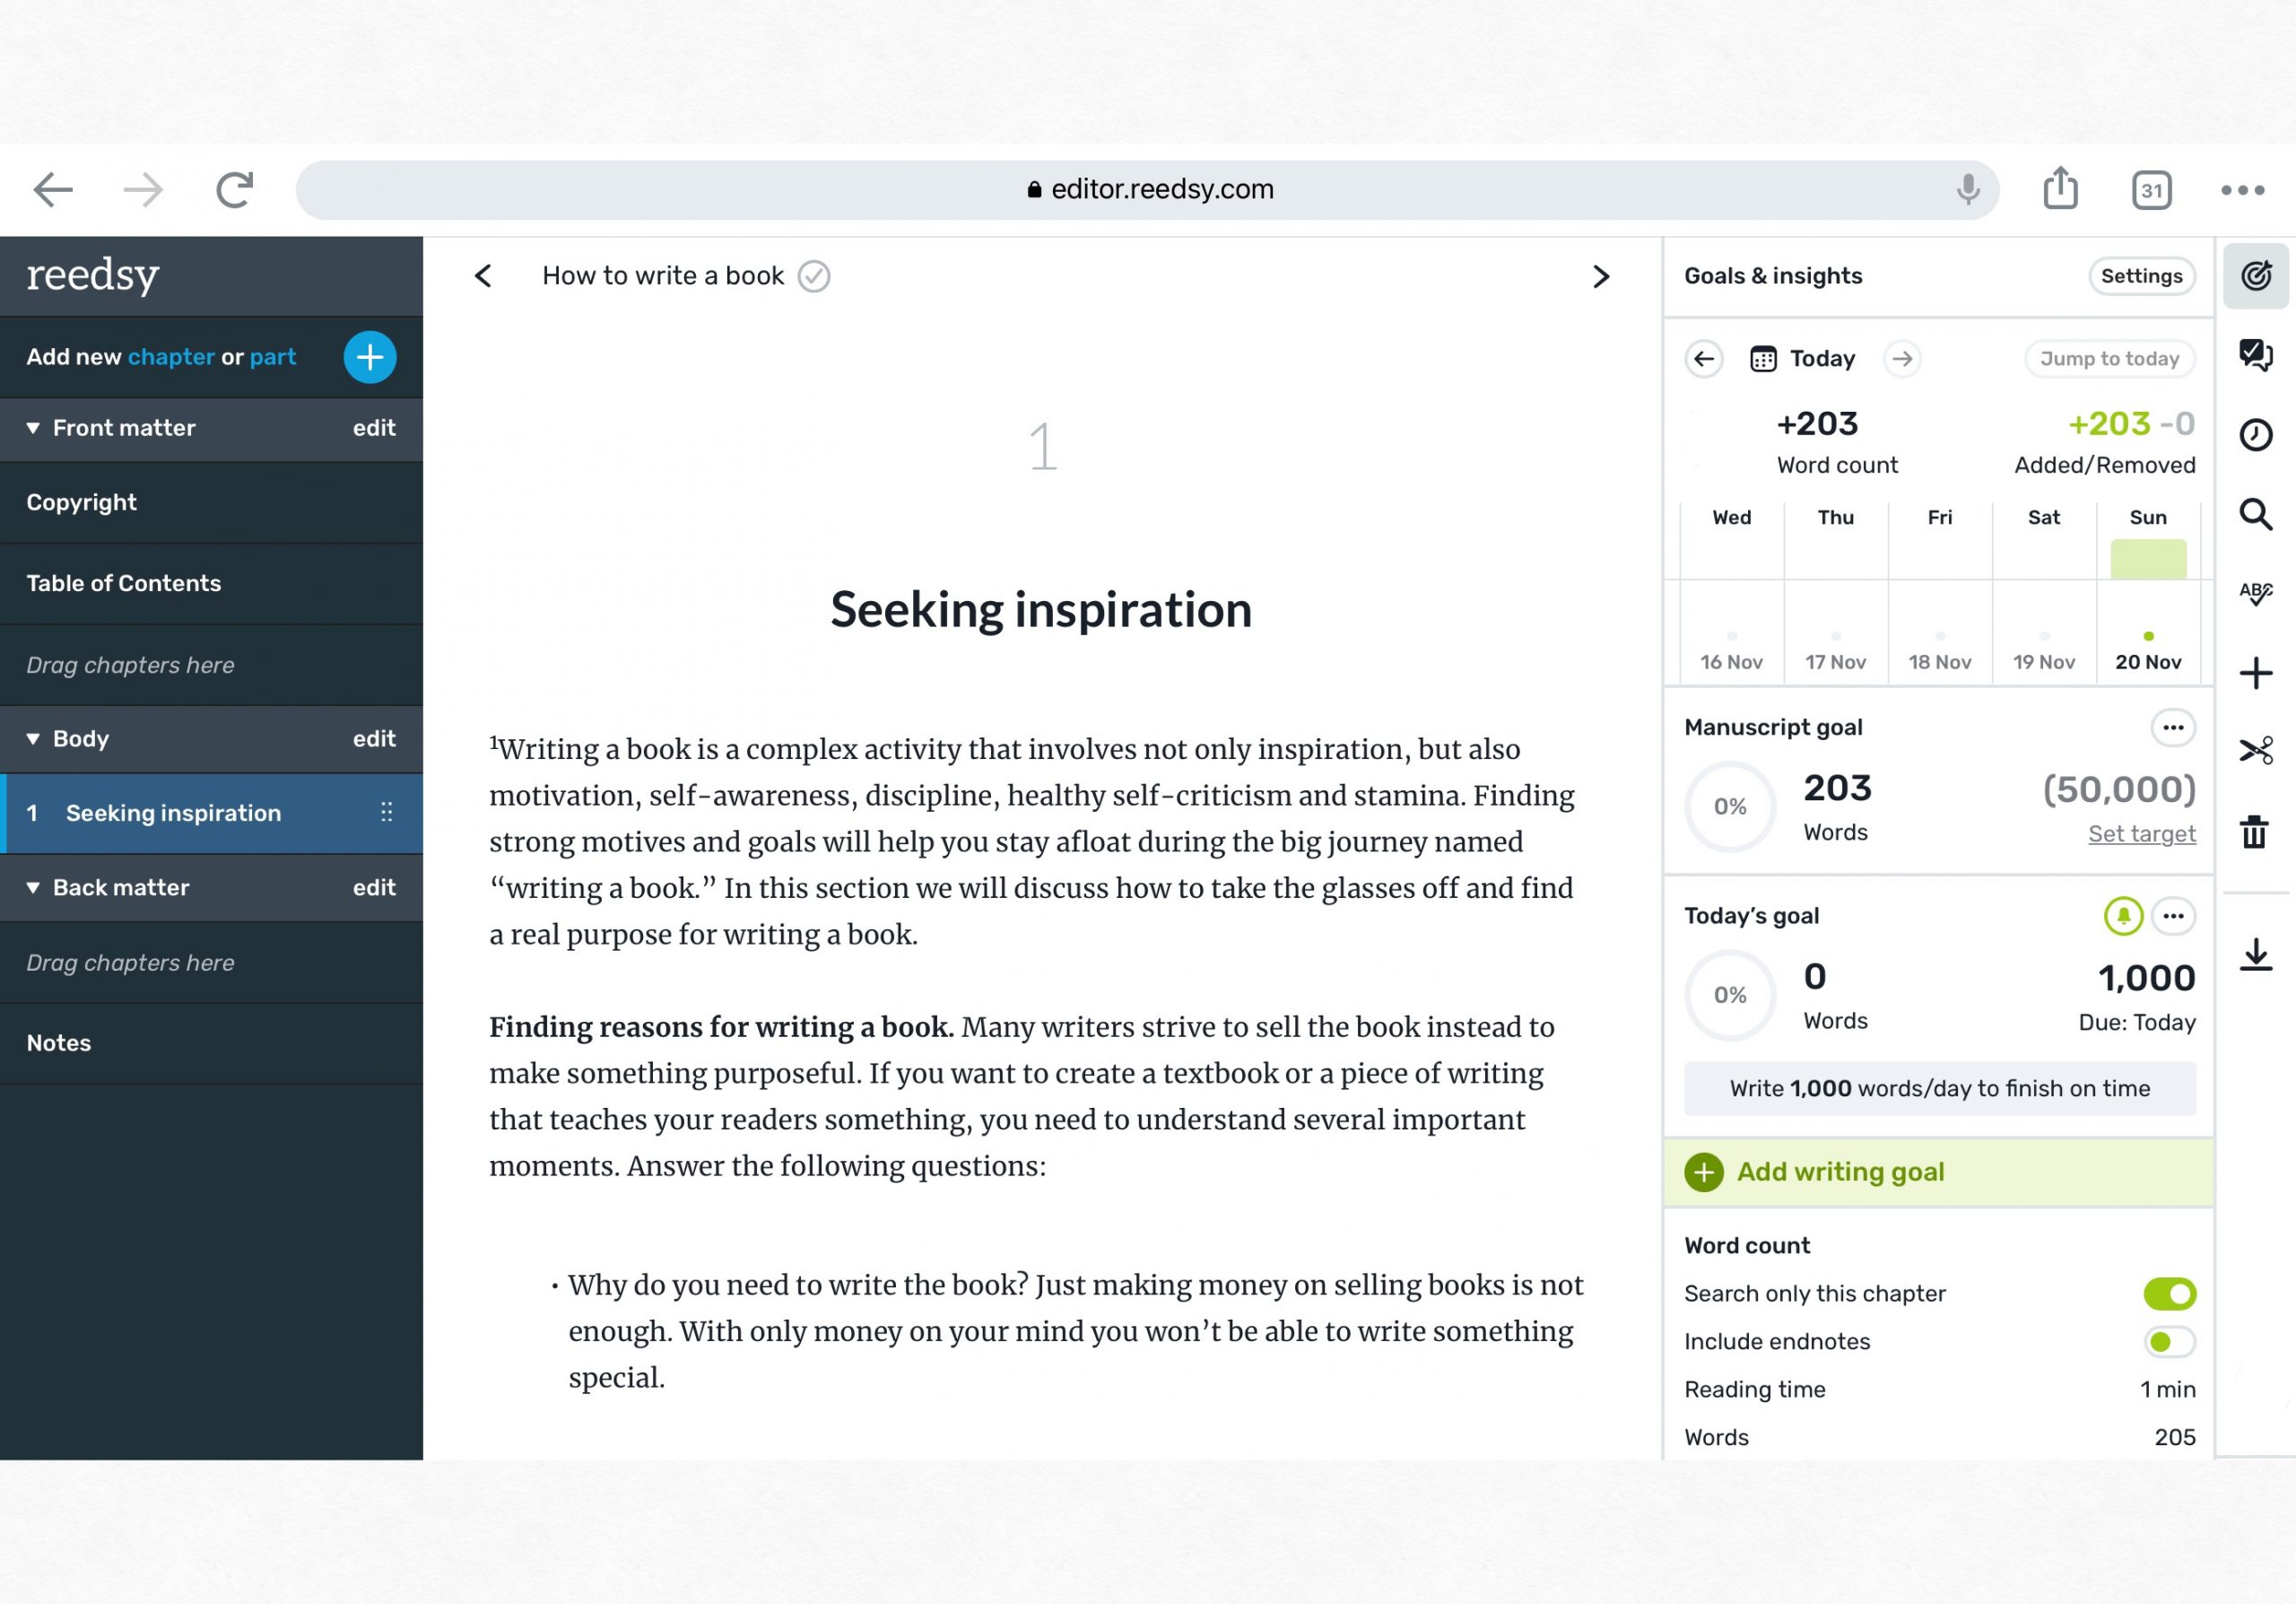
Reedsy. It’s quite a simple text editor which allows you to write your book chapters and format them easily. The editor has an auto intent to make your text look professional. Set writing goals and track changes you have made with a mouse click. Besides, you can save the text in pdf format and print it out. Reedsy also has a great community and a variety of tips for aspiring and professional writers.
Writing the first draft
After you spend some time searching for the idea for the book, defining your target audience, and creating a productive working space, it’s time to focus on writing your first draft. We will discuss touching points to help you stay productive and create a well-written manuscript. Subsequently, this will give a good guide on your writing and make it flawless.
Writing plan
We hope you have read and followed our advice on creating outlines. If so, you have the basis. If not, now might be a good time. It will take a lot of time to write a book, and you will experience a burst of energy followed by a lack of motivation. Creating a deadline for the first draft, setting the required writing goals, and creating a writing schedule will help keep the progress.
Set the deadline. When you see the final date, it becomes your guiding star on the path to the manuscript. Be realistic and define the scope. If you plan to write a 300-page book for a month while balancing your job and family, you are more likely to fail and get nervous. Planning your time pushes you to do what is enough and gives you balance in other activities.
Word count. It’s always great when you have an idea of the word limit. The number of pages will depend on the type of book you will create and your prospective audience. If you are addressing young adults and students, you may follow the limits between 20,000 to 50,000 words. Also, the word count will depend on the topic, your information, and the number of chapters.
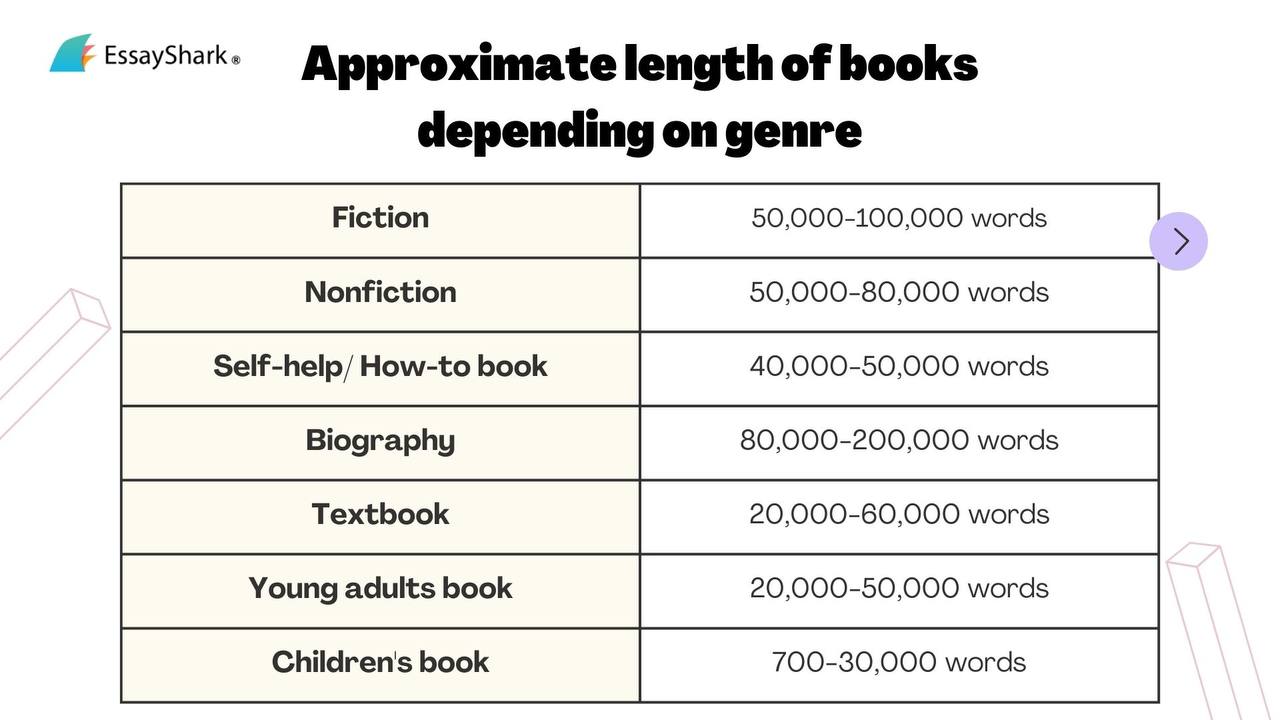
Why is it important to set the word count limit? First, the price for editing will be lower. Second, the cost of publishing a smaller printed version will be lower. Third, your prospective audience expects an approximate length. For example, if students must choose between long and shorter versions of books, they will prefer shorter ones.
Consider the word count of competitor books to find out the average word count. It doesn’t mean you should stick to this average word count; just consider it while writing and make your book as long as you wish.
Writing goals. How much time are you going to dedicate to writing the book? While the editing process and publication take additional time, you need to set a realistic deadline for finishing the book.
Set daily goals for writing. This point requires a tremendous amount of self-discipline, as most of us tend to find excuses to avoid things we don’t want to do at the time.
So, how to set the writing goal? You can set both word count limits and time limits. For example, you can write 500 words every day. Or select the timer for an hour and dedicate this time strictly to writing. Make sure you can quickly achieve the goal without sacrificing other valuable things.
Learn how to set your goals with recommendations using the SMART approach from Walden University.
At the same time, try to stay flexible. It’s almost impossible to write daily, no matter how persistent you are. If you tend to set unrealistic expectations and goals, it may end in burnout and disappointment. Don’t forget to schedule recovery time and monitor your creative energy.
Writing books takes time, as you may want to change some parts, rewrite, or add something. That’s why it will be better to write more and later edit as you cut unnecessary pieces.
Opening sentences.
Whether you are writing fiction or a textbook, dedicate some time to writing a captivating first line of your book. The information you will give the reader at the very beginning will add more color to the information you present and help the reader prepare for the journey.
Consider the following typical ideas for your “once upon a time” line:
- Fact. With a simple sentence, you can tell the reader the entire meaning of the book. Or write about the fact that it is already known to a wide variety of readers.
- Eternal principle. You can state the obvious principle. For example, you can tell that learning something broadens your mind.
- Author’s story. If you address your book to students, it’s good to show that the author has been in their shoes.
- Flashback to the past. Relate the topic of your book to the facts from history. Or disclose some facts from the past of your main hero.
- Extraordinary. Boom! And with a wave of a magic wand, you have written the book. Magic? No, just an introduction to a book on writing.
- Experiment with opening sentences for each chapter, but consider the most time to the book’s first line. Try various approaches to find the tone, and you will find one that sounds the best.
Tone of voice
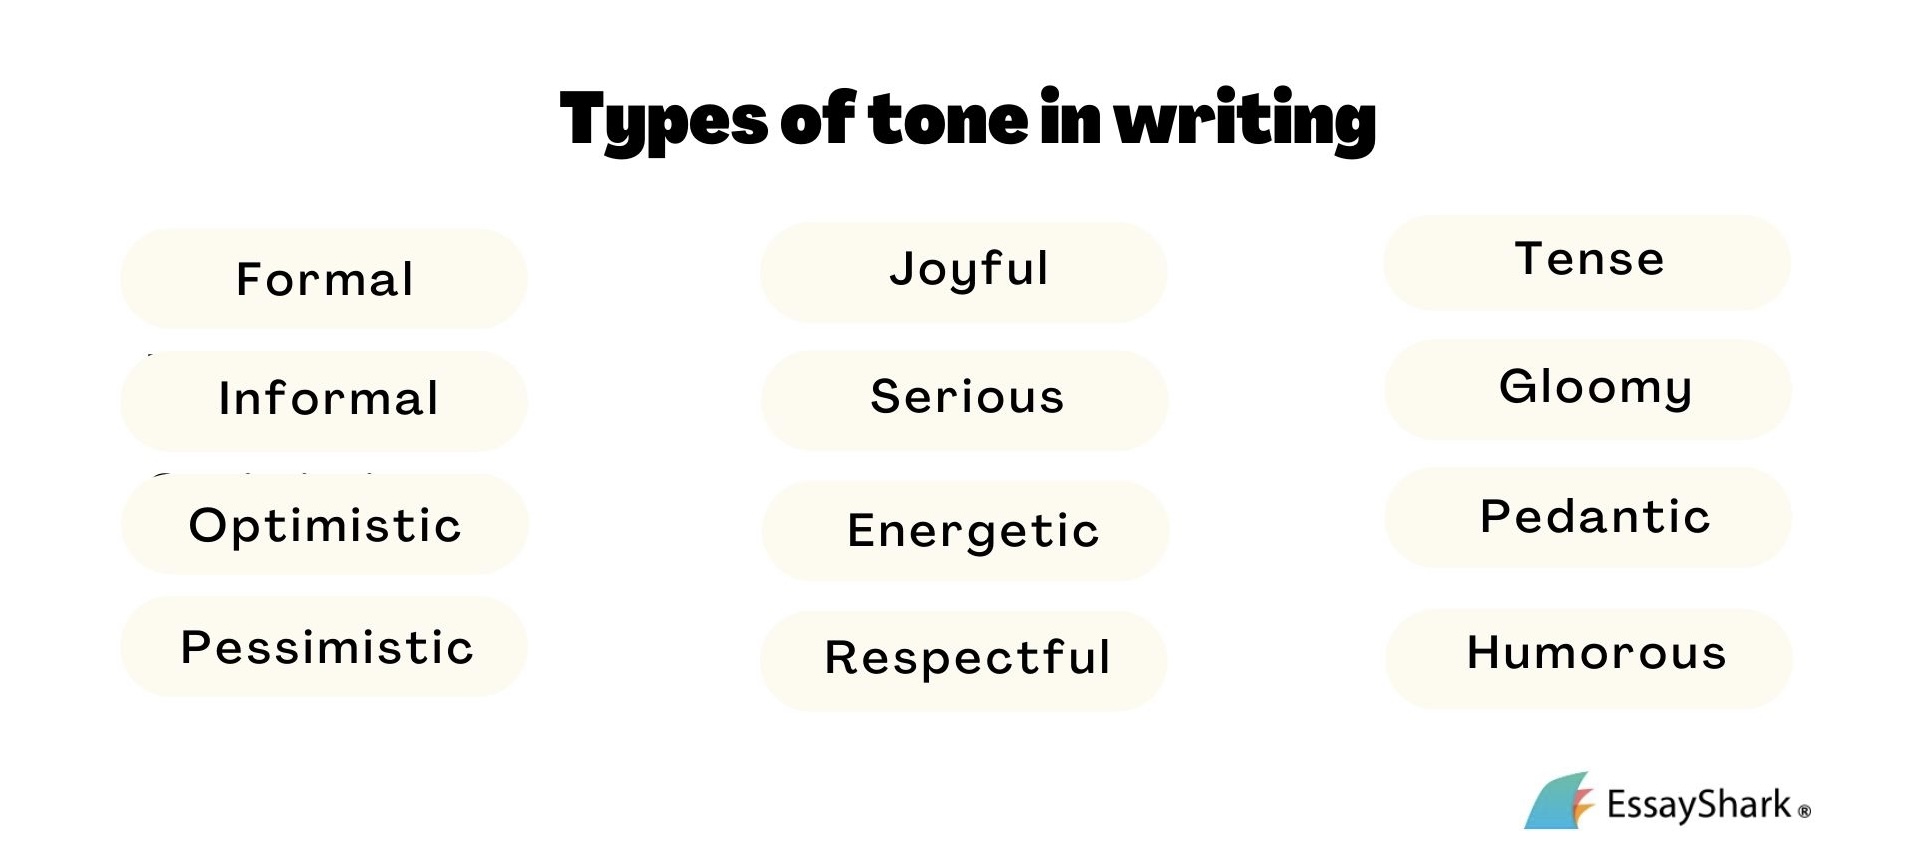
When we talk to people, we express emotions. Imagine how many tones you can add to a simple “How do you do?” For example, you can add a smile to sound optimistic and sincere. The same happens when you write. Carefully choose the words to make the reader feel the emotions and attitude of the story or text.
While your text’s tone may vary from paragraph to paragraph, the whole mood will remain the same throughout the book. Choose the right style to convey the message of your book idea.
Tip. If you are writing a self-help or educational book, try to address the reader with warm, optimistic, and supportive words. Think of how you conversed with your friend in a coffee shop.
Keep in mind your audience and keep room for imagination. Trigger the reader’s interest with an inspirational tone and layering descriptions.
Proofreading and editing
So, you have written the last words of your book. We hope you feel happy and exhausted. But there are some steps you need to take before publishing your book. And one of those steps is editing.
If you have already written essays and other papers at university, you probably know that every detail matters. So is the text of your book. Every draft of a book comes in several stages of edition and revision before it gets published. Your readers are welcome to read your book, so don’t disappoint them!
Editing a book is more than correcting spelling and grammar mistakes. It’s about the delivery of the text, where every phrase and sentence matters. Whether you have written a self-help book or science fiction, you need to edit.
You have several options for how to edit the book. It will depend on whether you self-publish your book or work with a publishing house. Typically, publishing houses have editors who will polish your text. But if you work independently, you have various options where you can choose what sits you.
- Self-editing. It’s the cheapest option which will improve your grammatical and editing skills. For a better result, it’s advisable to brush up on grammatical rules and learn more about how to improve the text. We recommend you explore Self-Editing for Fiction Writers and The Copyeditor’s Handbook to get more practical tips and advice on editing trends and language practices. You will need to edit your text at least twice to get a good result. In the first round, you look at the text structure and readability; in the next paraphrasing step, you check for typos and other mistakes.
- Beta readers. You can ask your family or friends to read out your text. Also, there are writing communities where you can find volunteer editors ready to check your text. Before you give your text to other people, provide them with a list of questions or points to consider while editing.
- Professional editors. If you require a professional editor, you must remember that every editor has different expertise. You need a copy editor if you want someone to correct phrases, grammar, spelling, and word choice. If you need to fix plot holes, dialogues, and overall perception of the text, you need a developmental editor.
How to edit your book in 7 steps
If you have decided to edit and proofread your draft without help, here is a step-by-step guide to doing it right.
- Set your book aside. You deserve a break and a little celebration! Relax for some time and reward yourself before you start the editing process. It may be a week or more to tune into a productive mood. Such rest after a long run of writing will allow you to look at your draft with fresh eyes.
- Read the text aloud. This technique is common but powerful. When you read aloud, you comprehend information better and identify mistakes easier. Besides, you can record your voice and play it while correcting the text.
- Focus on the big picture. It’s essential both for fiction and non-fiction books. Look at your text as a whole, finding gaps between passages and ensuring that the storyline creates a coherent narrative. Check dialogues, characters, and plot consistency if it’s a story. If it’s a self-help book, make sure that your recommendations and stories are understandable and well-structured.
- Look at each part separately. Every sentence should have a purpose. Identify those parts that need more extended writing, or cut unnecessary details. Ensure that every piece has an opening sentence and the transition sentence at the end of every chapter.
- Edit the text. When the overall context is clear, it’s time for grammar, punctuation, and spelling correction. Read every sentence and fix mistakes. Delete or replace with synonyms frequently repeating words, rewrite passive voice expressions, and improve hard-to-read sentences.
- Check reliability. If you have used facts, historical details, or statistics in your book, ensure it’s accurate. Check reliable sources to be sure you used them correctly. Refer to credible sources if needed.
- Hire a proofreader. Or ask someone attentive to details to read your text. It’s always a good idea to check the text with the second pair of eyes.
WritersCafe. Free service allows you to ask other writers for advice on your writing piece. Moreover, you can search for publishers and join writer’s groups.
Inked Voices. A platform where writers can come together to share their writings, get critiques, and comment on texts. Also, you can find writing workshops and collaborate with writing groups from all over the world. The platform gives a 14-day free trial to test the platform.
Deciding where to publish
When you have the first draft, it’s time to think about where and how you want to publish your book. Book title, formatting, and book cover highly depend on the publishing method.
You have two options for book distribution:
- Publishing company. It’s a traditional way to publish a book. You need to find a publishing agent, write letters and proposals, and send your book copy to the editor or agent.
- Self-publishing. Luckily, today various services offer to publish your ebook, audiobooks, and hard copies. Moreover, such services offer book distribution, promotion, and other additional services to help readers find your book.
EssayShark has already published six books on Amazon KDP, and we can confidently say that self-publishing is one of the best ways to publish your books. In this article, we will share our experience and other helpful resources you can use to self-publish your book.
Top-4 of the best self-publishing companies
Kindle Direct Publishing (KPD by Amazon).
It is one of the most popular and influential online publishers (keeping more than half of the market). With KDP, you can publish ebooks, ebooks, and print versions. The service is free of charge to publish the book, but KPD has a royalty payout.
PublishDrive.
It distributes various book types, including ebooks, audiobooks, and hard copies. The service lets you publish your book on major online digital bookstores like Amazon, Apple Books, Audible, iReader, Barnes & Noble, Google Play Books, and more (400+ stores). The service covers 100 countries. PublishDrive offers a 14-days free trial.
Barnes & Noble Press.
This service is a direct competitor of KDP and offers the publishing and distribution of ebooks and print books. This place offers various print options and excellent quality if you wish to publish print books. Readers will find your book on BN.com and through NOOK devices.
Apple Books.
As an author, you can publish ebooks and audiobooks through Apple Books. It’s free and gives you access to 1.4 billion Apple device users from more than 50 countries. The free publishing service will require approximately 70% royalty payout.
Coming up with a book title
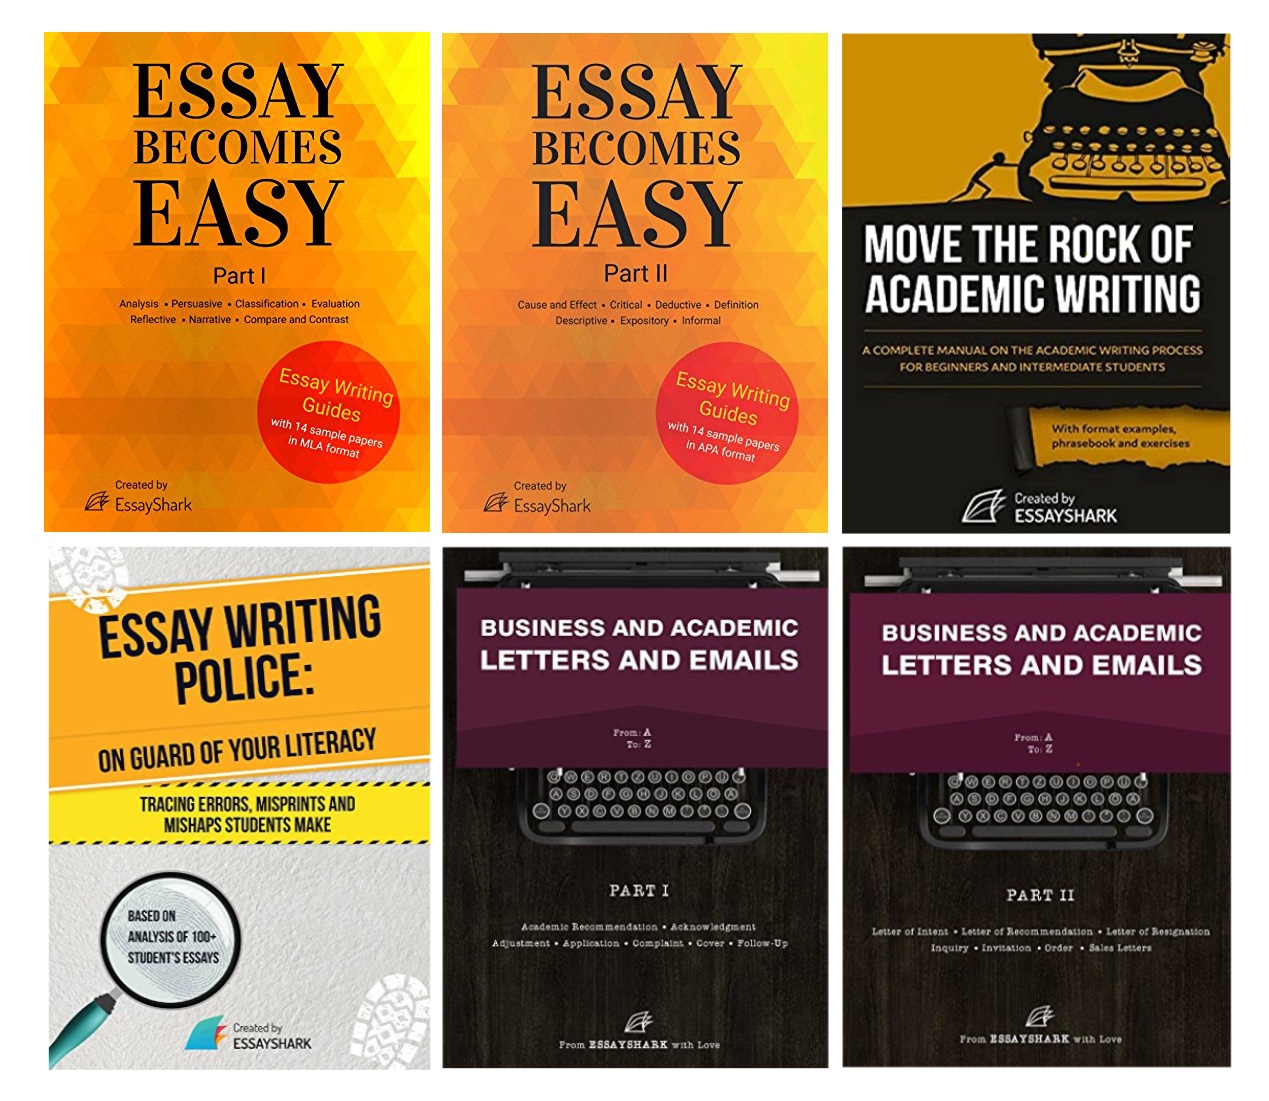
Hoping you have got the final edited version of your book. Now it’s time to think about the title. Maybe you already have some ideas, but let’s talk about them in a deeper context.
The book title is an invisible thread that may connect you and the prospective reader. Writing a title that will acquaint readers with your book and catch their attention should be highly prioritized.
6 steps to pick a book title
- Do research.
Take a topic-related subcategory on Amazon and make a list of titles you like. You can also look through the list of books in other categories for inspiration. For convenience, create a list of phrases, adjectives, or full titles in a separate file. Also, we advise you to use Google Ads and try to find related google search keywords related to your book topic.
- Use patterns.
When you have a list of titles you like, try to transform each into your title. Just add your own words and change phrases. Playing around with such patterns will give you a place to start and come up with variants you like.
- Turn on imagination.
Use brainstorming techniques and write down words that come into your mind when you think about your book.
- Add subtitles.
If you are writing a self-help or educational book, adding a subtitle will give additional information to the reader. Moreover, you can include keywords (so loved by Amazon search engine) in subtitles and leave your main title more abstract or keywords-free.
- Use book title generators.
If your imagination is stuck and cannot give you an excellent title, it’s time to turn to online services. Spin the wheel and get a list of titles that suit you. For example, you can use Adazing to create titles for general fiction, fantasy, romance, science fiction, non-fiction, and self-help books.
- Polish the title.
Be original and make your title unlike others. Keep in mind that the reader will be impressed and glued to reading the book with the book cover.
Tips to follow when creating a book title
- Catch the reader’s attention. Your title may take the form of a question and add intrigue. Ensure that the question corresponds to the topic of your book and does not confuse the reader.
- Refer to the book genre. Romantic novels will be less likely to be titled Rise of Titans. People tend to choose the usual things and will more likely pick the title that recalls the genre’s favorite titles.
- Stick to the adequate length. The main idea of a good title is to reveal a bit about what will happen inside the book. The length of the title of the book may extend unless the usual reader can print it in Google or Amazon search.
- Adopt the thumbnail image. Mostly, book covers are presented in thumbnails in any online bookstore. So be sure that the text will be readable. If your title is long, make one phrase bigger and the other words smaller. Keep in mind that the bigger phrase will give a connotation to the overall sense of the book.
- Use keywords. Yep, if you plan to sell your book online, it’s highly important to use keywords related to the book topic. When people search books of your genre, they will look for potentially related words.
- Avoid morally unacceptable phrases. Nowadays, it’s pretty easy to hurt people regarding sensitive issues. Be careful with expressions in the context of prejudice or offense.
Creating book cover
There is a proverb, “Don’t judge the book by its cover,” but for good marketing and promotion, it’s not true. How do you choose the book by yourself? What attracts you to pick the book? Typically it’s a book cover design and title. You will be tempted to look into the book when you see an attractive design accompanied by a catchy title.
A book cover is a powerful visual device that lets the reader make quick conclusions about the book. That’s why popular publishers and best-selling authors spend a lot of time with designers to create book covers.
Every book cover consists of
- Front cover. It is the face of the book, which contains the title, subtitle, and author.
- Back cover. It’s the other side of the book, which the reader will look at after seeing the front cover. It should contain a brief book description and some words about the author.
- Spine. This part of the cover is important for printed books. Books are usually stored vertically at the bookstore so that the reader can see only the spine. If you plan to sell your books in a physical store, make the spine noticeable and the title easy to read.
Tips on how to create a book cover
Explore competitors. Look at the covers of best-selling books in a particular category. Save the pictures you have liked the most. Also, explore other categories and examples of the best book covers for inspiration. Even if you delegate the cover to the designer, you must list your requirements and provide samples you like.
Stick to the book genre. The design of your cover should correspond to the book’s content and genre. Mostly, people prefer two-three genres and quickly identify them on bookshelves. Books of one genre typically have similar designs, which unites them into one category. Science fiction will more probably have space and fantastic designs, while poetry usually has a more romantic and classic outlook. But it doesn’t mean that you have no room for creativity.
For example, if you plan to write an educational book, it’s better to choose simple and minimalistic designs for the book cover. Explore examples for inspiration from 99designs. As you can see, all of them are quite simple and sometimes contain interesting illustrations to attract more attention.
Match to the right tone. The cover will be light and joyful if your book is written in a humorous tone. Cartoonish illustrations with curly font will set an appropriate mood for a book that should melt people’s hurts. And more serious writing will have a strict design and font to tell the reader that this book is no joke.
Pay attention to details. The cover design is artwork, so you must start with a color palette to identify key font colors, background pictures, and other details. Then decide whether you need to use illustrations and the author’s image. Also, think about the placement of the title, subheadings, lighting, shades, and text style. Everything should create an epic cover book.
Make a unique style. Your book should stand out from other books in the category. it mst be noticeable and attractive on the bookshelves. Consequently, your book covers will be a part of your brand as an author, so be sure to include something distinctive. Subsequently, readers will easily find your books just by seeing your book covers.
Online free tools to create the book cover by yourself
Canva. With Canva, you can use various templates or create your ebook cover design. Even if you have no expertise in design, this user-friendly service will help you get great results.
Adobe Express. Allows you to search among hundreds of templates. You can use any for inspiration or turn the images you like into book covers. Applications are available on Android and Apple devices.
Designer. This website is a great source of royalty-free images and templates to convert into unique covers. Besides, you can use an iOS application solely created for ebook covers here.
How to create a book cover on Amazon
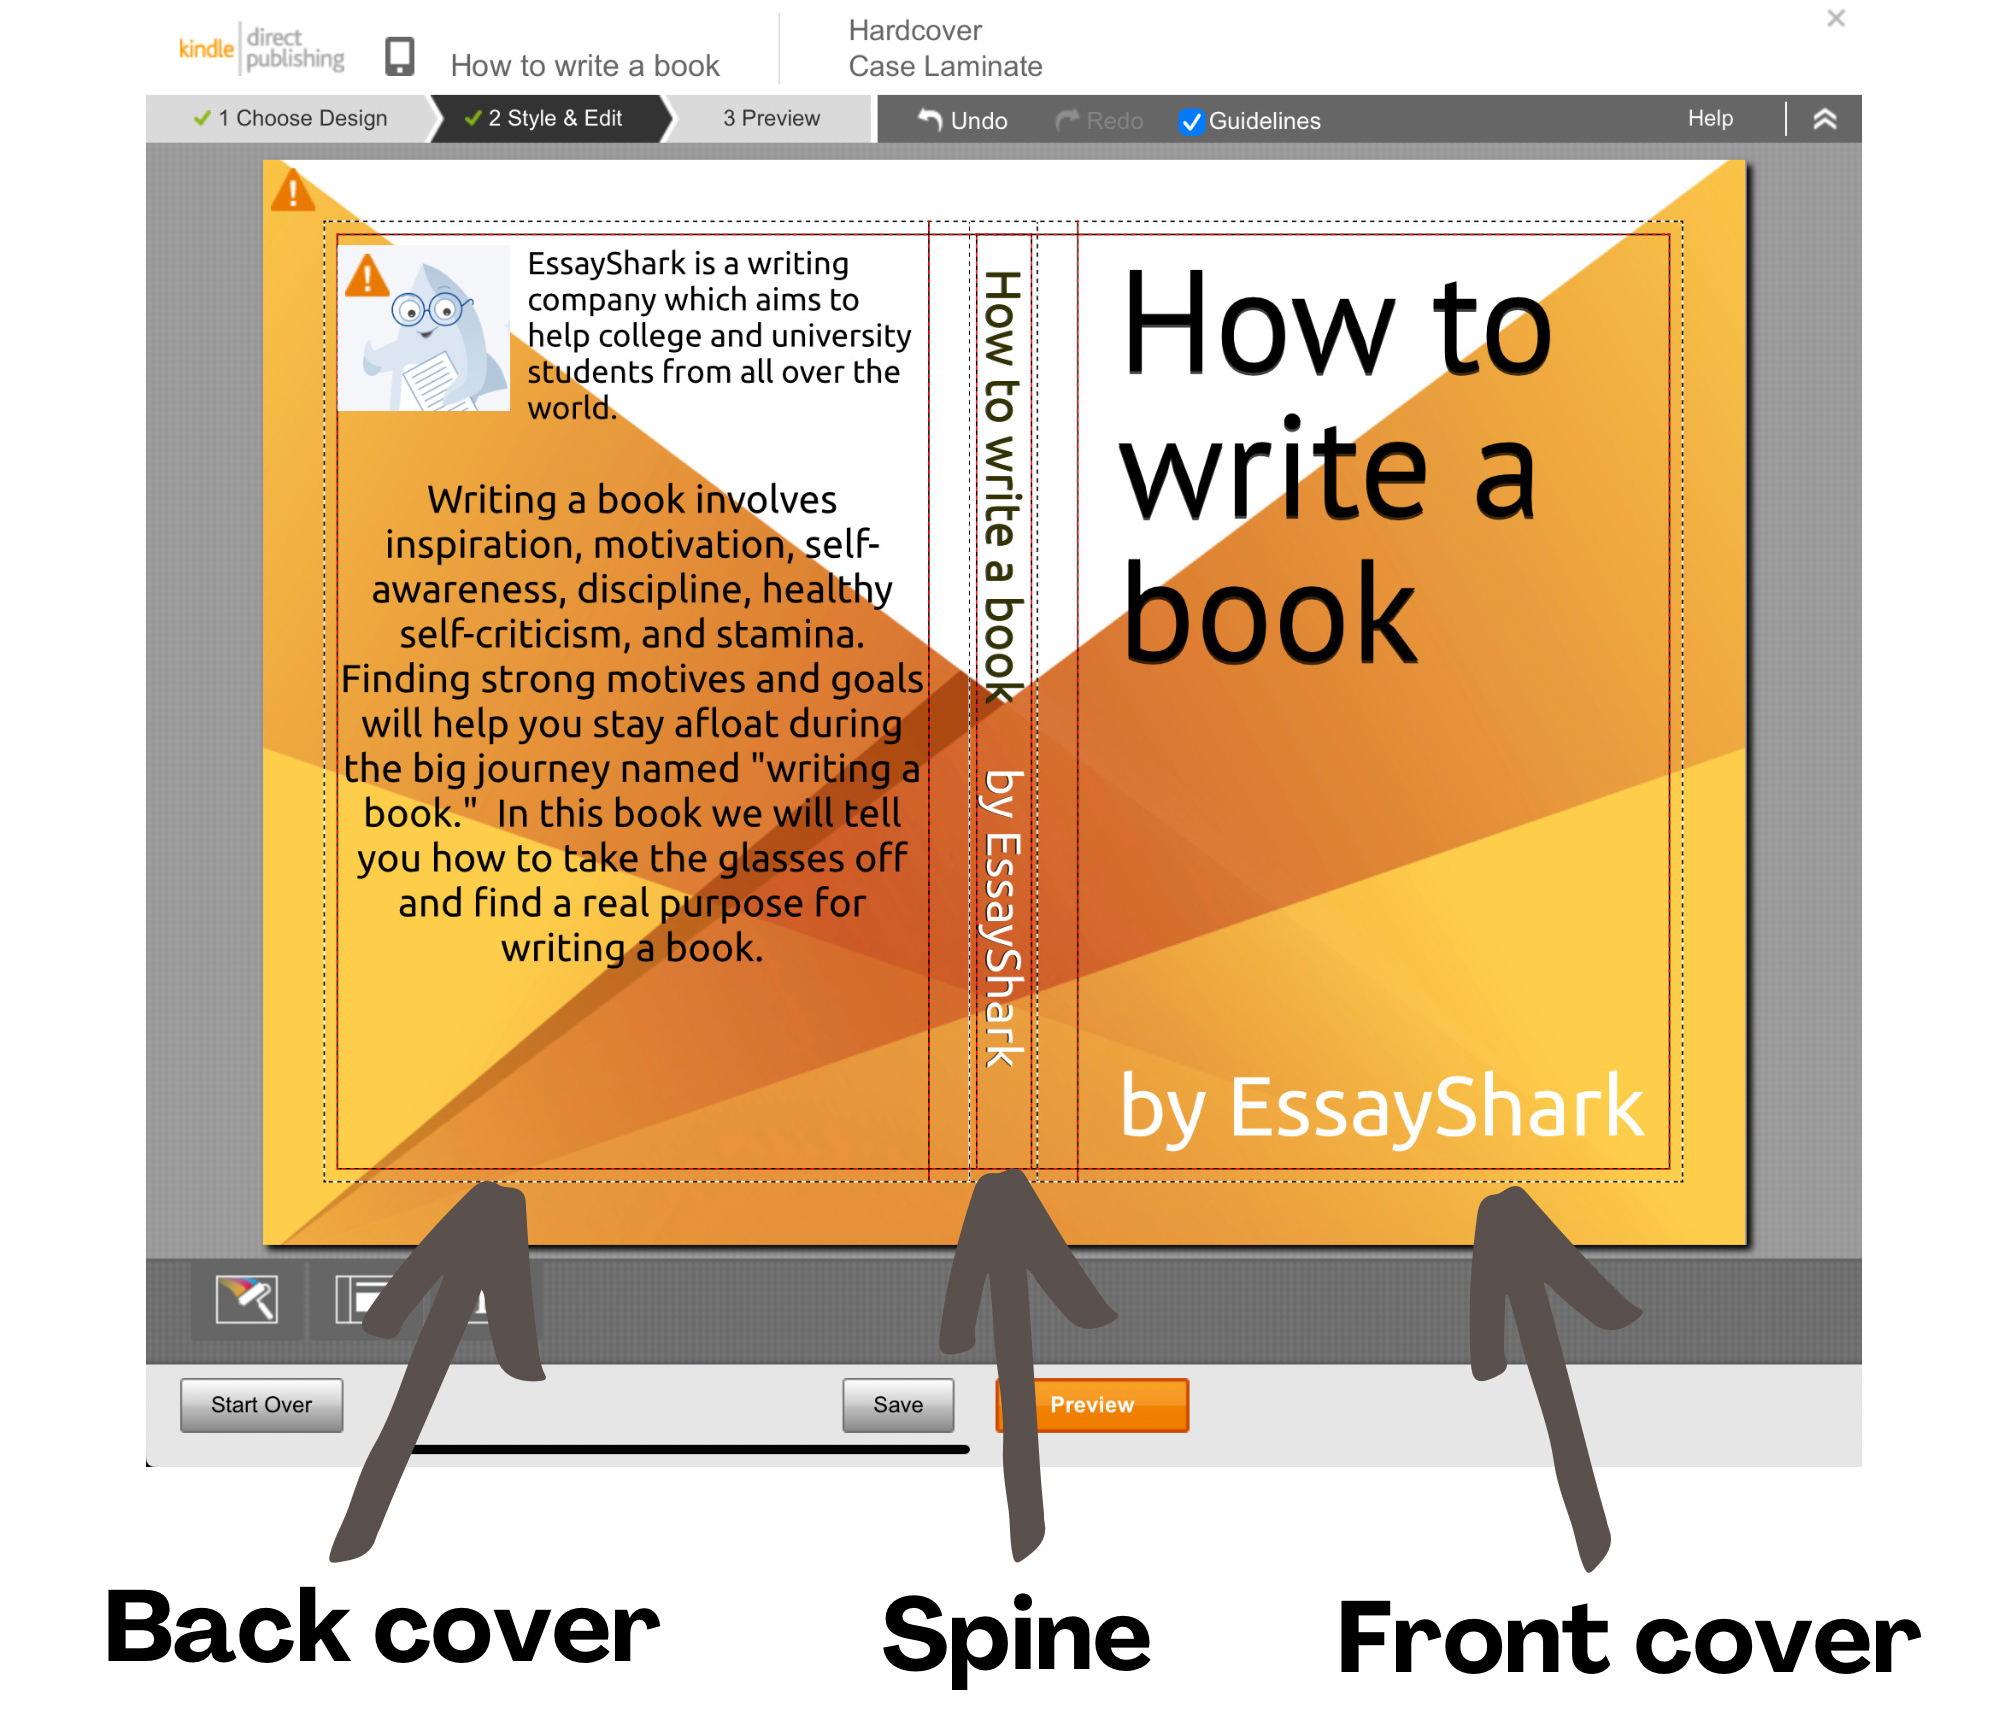
If you have decided to publish on Amazon, creating a book cover on your own is quite simple. You must fill in the form with the necessary details and use a built-in cover editor. Place the image of your cover, add text, and choose the font size, color, and style.
When designing the front cover, make sure it will look good in the snapshot. If you sell your book in an online bookstore, readers usually see small images on book covers. Make sure that the book title will be readable in a small image.
Place your photo or logo on the back cover. Write a short author’s bio near the image to let your readers know more about you. Don’t forget to add a book description to disclose the main details about the book and your prospective reader to choose your book.
Tip. You can find the exact dimensions for the cover with an Amazon calculator. It will be helpful if you order a book cover from a designer or do it yourself in an editor program.

